How to Turn Socks Into Adorable DIY Hand Puppets
Have you ever noticed how a simple pair of socks can be transformed into a world of creativity and imagination?
Imagine this: a rainy afternoon with the family, boredom creeping in, and then a spark of inspiration hits. What if those colorful socks lying around could become the stars of your very own puppet show? With just a few crafting supplies like buttons, felt, and yarn, you can breathe life into these socks and turn them into adorable hand puppets.
Choose a sock that ignites your creativity and start designing distinct facial features, securing eyes and mouths with glue. Style hair using yarn, add accessories like glasses, and attach arms made from fabric.
Complete personalization with clothing and props, giving your puppet a unique personality. Imagine hosting your own puppet show for some family fun. Discover your puppet's full potential and let the storytelling begin!
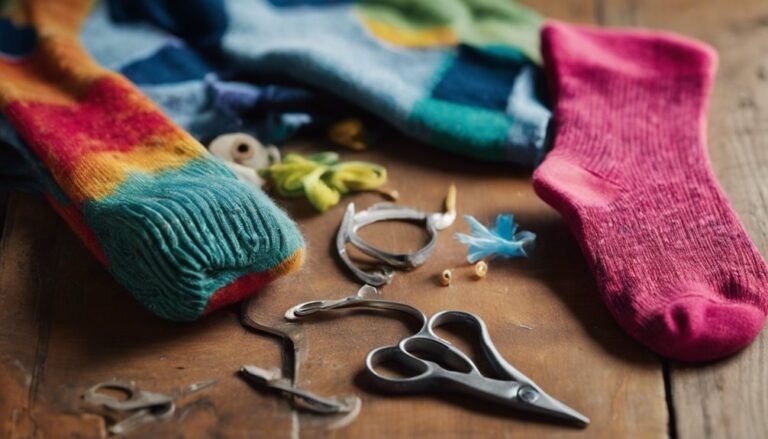
Gathering Your Materials

Before you plunge into crafting your DIY hand puppets, make sure you have all the necessary materials at hand. Start by gathering sock materials, ideally ones that are colorful and soft. These will form the base of your puppet. Next, assemble your puppet tools: scissors, glue, and a needle with thread are essential. Don't forget buttons for eyes or felt for details, adding personality to your creations.
To give your puppet character, grab markers or fabric paint for drawing features. Also, consider yarn for hair and any other embellishments that catch your eye. Having everything ready means you're free to create without interruptions. With your materials and tools gathered, you're set to release your creativity and bring those sock puppets to life.
Choosing the Perfect Sock
Selecting the ideal sock is essential for crafting a successful hand puppet. Begin by exploring various sock styles—think plain, patterned, or even fuzzy. Each style offers unique possibilities for your puppet's personality. Consider the sock's length; a longer sock might give you more material to work with, while a shorter sock can be easier to manage. Next, focus on color combinations. Vibrant colors can make your puppet lively, while softer tones might lend a more subdued charm. Don't be afraid to mix and match! Pairing different socks can create intriguing contrasts and eye-catching designs. As you choose, imagine the freedom to release your creativity. Let your instincts guide you, and select socks that inspire your puppet-making adventure!
Designing Your Puppet's Character

Now that you've chosen the perfect sock, it's time to bring your puppet to life by deciding on its character. Start by imagining fun personality traits—will your puppet be mischievous, cheerful, or wise? Next, select unique facial features and distinctive accessories to make your puppet truly one-of-a-kind.
Choose Puppet Personality Traits
How do you breathe life into your puppet with character and charm? Start by imagining what kind of personality you'd love to create. Will your puppet have funny characters with silly voices that make everyone laugh? Or perhaps embody heroic traits, ready to save the day? Consider a shy personality that tugs at the heartstrings or an adventurous spirit that explores imaginary worlds. Your puppet could become a wise mentor, offering sage advice, or engage in mischievous antics that keep things lively. If you're drawn to fantasy, why not create a magical being with enchanting stories? Mix and match traits to craft a character that's as unique as you are, bringing endless fun and freedom to your puppet shows.
Select Unique Facial Features
When creating your puppet, a world of possibilities opens up with just a few design choices. Start by imagining quirky expressions and unique shapes that reflect your puppet's personality. Consider eyes first—big googly ones can give a lively, curious look, while tiny buttons might suggest a more mysterious character.
Next, think about the nose. A pom-pom could add a playful touch, or try an elongated felt triangle for an unusual flair. For the mouth, experiment with different materials—yarn for a simple smile, or felt for an exaggerated, cartoonish grin.
Your puppet's eyebrows can also make a big impact; angled pipe cleaners might convey surprise or mischief. Don't forget, your puppet's face is a canvas for freedom and creativity!
Pick Distinctive Accessories
Once you've crafted your puppet's facial features, it's time to bring its character to life with distinctive accessories. Immerse yourself in your stash of colorful embellishments and quirky materials. Think tiny hats made from old bottle caps, or capes sewn from vibrant fabric scraps. Layering these unique touches gives your puppet a personality all its own. Use the table below for inspiration:
| Accessory Type | Colorful Embellishments | Quirky Materials |
|---|---|---|
| Headwear | Pom-poms, ribbons | Bottle caps, felt |
| Clothing | Sequins, fabric paint | Old buttons, lace |
| Props | Mini flags, yarn | Pipe cleaners, corks |
Let your imagination run wild! Mix and match to create a character that's uniquely yours. Remember, freedom in design makes your puppet not only a craft but an expression of creativity.
Adding Eyes and Facial Features

Start by picking the perfect materials for your puppet's eyes, like buttons, felt, or googly eyes, to bring it to life. Next, craft expressive features by shaping the mouth, eyebrows, and nose using fabric, yarn, or markers. Remember, each feature adds personality, so let your creativity flow!
Choosing Eye Materials
Adding eyes and facial features to your DIY hand puppet can bring it to life and enhance its character. Start by choosing the perfect eye materials. Googly eyes are a classic choice—they're fun and instantly add personality. For a softer look, cut felt circles in various colors. Want something unique? Sew on button eyes for a charming, vintage feel. Get creative with pipe cleaners for quirky, expressive eyebrows. For a textured touch, use fabric scraps or foam shapes. If you're feeling artistic, try painting features directly onto the sock. Don't forget sequined accents for a bit of sparkle! Mix and match these materials to create a puppet that's as unique as you. Let your imagination guide you and enjoy the creative process!
Crafting Expressive Features
To craft expressive features on your DIY hand puppet, begin by gathering your chosen materials and tools. Start with eyes, which are essential for those playful expressions. Use buttons, googly eyes, or felt for different looks. Secure them with glue or needle and thread. Now, let's add expressive eyebrows. Cut small pieces of felt or use embroidery thread to sew them on. Position them creatively to convey surprise or mischief. For the mouth, use a contrasting color felt or fabric marker to draw a smile or frown.
Here's what you'll need:
- Buttons or googly eyes
- Felt in various colors
- Needle and thread or fabric glue
- Fabric markers
- Scissors
Crafting a Mouth and Tongue
Once you've gathered your materials, let's plunge into crafting the mouth and tongue of your hand puppet. Start with the mouth design: cut a piece of cardboard into a semi-circle, ensuring it fits comfortably in the sock's toe area. This will form the puppet's mouth. Cover the cardboard with a piece of felt or fabric, securing it with glue to create a smooth surface. For the tongue, choose your tongue materials like bright red felt or fabric. Cut a small oval or tongue shape, and glue it inside the mouth, letting it peek out slightly for character. Slide the cardboard into the sock, aligning it with the toe area, and secure it with adhesive to bring your puppet's mouth to life!
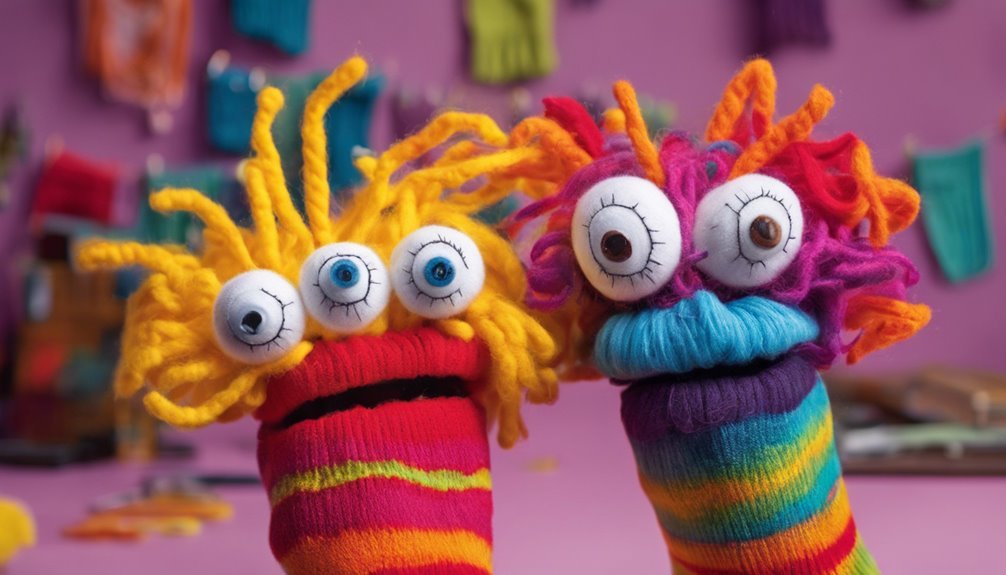
Creating Hair and Accessories
When it comes to bringing your puppet to life, creating hair and accessories can add a burst of personality. Start by exploring different hair materials like yarn, felt, or even shredded fabric. Cut them into desired lengths and glue or sew them onto the puppet's head. Next, let your creativity flow with accessory ideas that suit your puppet's character. Think of tiny hats, bow ties, or glasses. Use buttons or beads for eyes to add extra charm.
To keep it fun and free-spirited, here are some ideas:
- Yarn hair: Bright colors for a funky look.
- Felt hats: Easy to shape and customize.
- Beaded necklaces: Adds flair and sparkle.
- Miniature glasses: Clever personality touch.
- Fabric bow ties: Chic and playful.
Unleash your imagination!
Attaching Arms and Hands
With your puppet's personality shining through its hair and accessories, it's time to focus on attaching the arms and hands. Start by selecting a pair of small socks or fabric pieces for the arms. Cut them to your desired length, keeping in mind the freedom of hand movements you'll want for lively performances. Stitch or glue these pieces to the sides of the sock puppet, making certain they're secure but flexible.
Next, create hands using felt or lightweight fabric. Cut out small hand shapes, and attach them to the ends of the arms. For more expressive hand movements, consider adding a bit of wire inside to allow bending. Once attached, test the arm mobility to confirm your puppet's ready to come alive with dynamic gestures.
Personalizing With Clothing and Props
While your puppet's arms and hands add character, clothing and props can truly set it apart. Start by diving into sock customization with creative flair. First, consider the personality you want to bring to life. Is it a cheeky pirate or a graceful ballerina? Use small fabric scraps for shirts, skirts, or capes. Raid your craft box for fun character embellishments like buttons, beads, or tiny hats. Don't forget to add props to enhance your puppet's story—perhaps a tiny book or a toy guitar.
Here are some ideas to get you started:
- Miniature hats for a stylish touch
- Felt capes for superhero puppets
- Tiny glasses made from wire
- Small scarves for added flair
- Mini backpacks for adventure-ready characters
Let your imagination fly!
Bringing Your Puppet to Life
To bring your puppet to life, start by adding expressive facial features like eyes and a mouth using buttons, felt, or fabric paint. Next, think about the personality you'd like your puppet to express—is it cheerful, grumpy, or adventurous? By combining these features and personality traits, you'll create a puppet that's ready to captivate its audience.
Adding Facial Features
Facial features are where your puppet's personality truly shines. Start by deciding on the facial expression you want—this will guide your eye placement and color choices. Think about the character emotions you want to convey. Use creative materials like buttons, felt, or fabric scraps. Consider feature proportions to guarantee that your puppet's expressions are well-balanced and lively. Enhance details with embroidery or fabric paint for added charm.
Here are some tips to get you started:
- Eye placement: Experiment with different positions to create unique expressions.
- Color choices: Use vibrant colors to capture attention or subtle shades for a softer look.
- Feature proportions: Keep everything in harmony for a natural appearance.
- Character emotions: Reflect moods with mouth shapes and eyebrows.
- Creative materials: Mix and match for originality.
Crafting Puppet Personalities
Bringing your puppet to life is an exciting step where creativity and imagination meet. Start by brainstorming unique puppet personalities. Think about traits that make your puppet stand out. Is it adventurous or shy? Is it a storyteller or a listener? Once you've got a personality in mind, consider how to incorporate these traits into your puppet's appearance and voice.
Next, immerse yourself in character development. Give your puppet a name that matches its personality. Create a backstory—where does it come from? What are its dreams? This will help you bring more depth to interactions. Practice different voices and expressions to match the character traits you've chosen. Let your puppet's personality shine, and enjoy the freedom of creating a world where your puppet thrives!
Hosting a Puppet Show
Once you've got your hand puppets ready, it's time to bring them to life with a puppet show! Start by selecting engaging puppet show themes that resonate with your audience. Consider adventurous stories or comedic sketches. Set up a cozy performance area, ensuring everyone can see your puppets in action. Practice your script to keep the show flowing smoothly and maintain audience engagement. Add sound effects or music to enhance the experience.
Here's how to make the most of your puppet show:
- Choose a fun theme: Fairy tales, superheroes, or original stories.
- Create a colorful backdrop: Use simple materials like sheets or cardboard.
- Involve your audience: Ask questions or let them suggest plot twists.
- Keep it interactive: Encourage laughter and participation.
- Enjoy yourself: Let your creativity shine!
Frequently Asked Questions
How Can I Make My Puppet More Durable?
Don't worry about wear and tear. Start with reinforced stitching for strength. Next, apply fabric glue along seams for extra durability. These steps guarantee your puppet's ready for countless performances, giving you the freedom to create without limits.
What Age Group Are Sock Puppets Suitable For?
Sock puppets are great for kids aged 3 and up. They foster creative play and offer educational benefits. Encourage storytelling and role-playing, helping children explore emotions freely while developing communication skills. Let their imaginations run wild!
Can I Wash My Sock Puppet in a Machine?
Your sock puppet's like a delicate butterfly; machine washing could crush its spirit. Hand wash gently using mild detergent and cold water. Squeeze excess water, reshape, and air dry. Maintain its charm with careful handling and freedom-loving care.
How Do I Repair a Damaged Sock Puppet?
To repair your sock puppet, first gather sock materials similar in color. Sew any holes using matching thread. Reattach puppet embellishments with fabric glue or stitches. Get creative, make it unique, and enjoy the freedom to customize!
Are There Any Safety Concerns With Small Parts?
Imagine a child pulling a button off your creation. Small parts can be choking hazards. Make certain they're securely attached. Use non-toxic glue or sew them tightly. Always supervise playtime. Safety gives you creative freedom!